-
점심 메뉴 추천 프로그램Side Project 2023. 4. 9. 15:43
회사에서 점심 메뉴를 정하는 것도 일이다. 나를 포함한 막내 포지션 3인이 요일을 정해서 메뉴를 정하기로 했으나... 실행이 잘 안 되었고 "스트레스 받을 바에는 프로그램을 만들자!" 해서 점심 메뉴 추천 프로그램을 만들게 되었다. 웹은 추후에 만들도록 하고 일단은 소스코드와 DB만 만들었다.
데이터는 RDB로 관리한다. MySQL을 사용했으며 추후 다른 팀에서도 프로그램을 사용할 것을 고려한 유저 테이블(lnch_user), 음식 종류별 음식점 이름 및 음식점 거리를 관리하는 메뉴 테이블(lnch_menu), 먹은 메뉴를 날짜별로 관리하는 기록 테이블(lnch_record)로 구성했다.
-- 유저 테이블
CREATE TABLE lnch_user (
    SEQ_NO int not null auto_increment primary key comment '일련번호',
    ID varchar(10) unique,
    PW varchar(12)
);

-- 메뉴 테이블
CREATE TABLE lnch_menu (
    ID_NO int comment 'lnch_user.SEQ_NO',
	SEQ_NO int comment 'ID_NO에 따른 일련번호',
    CLASSIFICATION varchar(10) comment '한식/양식/중식/일식/기타',
    RESTAURANT_NM varchar(10) comment '음식점 이름',
    DISTANCE varchar(2) comment 'N: 근거리, F: 원거리'
);

-- 메뉴 테이블 - id_no 기준으로 seq_no를 생성하도록 trigger 걸기
DELIMITER $$
CREATE TRIGGER set_seq_no
BEFORE INSERT ON lnch_menu
FOR EACH ROW
SET NEW.seq_no = COALESCE((SELECT MAX(seq_no) FROM lnch_menu WHERE id_no = NEW.id_no), 0) + 1;$$
DELIMITER ;

-- 기록 테이블
CREATE TABLE lnch_record (
    YYYYMMDD date,
    RESTAURANT_NM varchar(10)
);
main.py를 실행시키면 점심메뉴를 추천해준다. 파라미터로 1차 선택 범위, 제외할 음식 종류나 음식점 이름, 거리를 선택할 수 있다. 먼저 lnch_menu를 읽어와 거리에 따라 데이터셋을 선택하고, 포함/제외 옵션을 반영한 최종 데이터셋을 구성한다. 추가로 lnch_record 테이블에서 어제 먹은 메뉴를 불러와 최종 데이터셋에서 제외시키고 random 모듈을 사용해 메뉴를 고른다. 마지막으로 lnch_record 테이블에 오늘 먹은 메뉴를 저장한다.
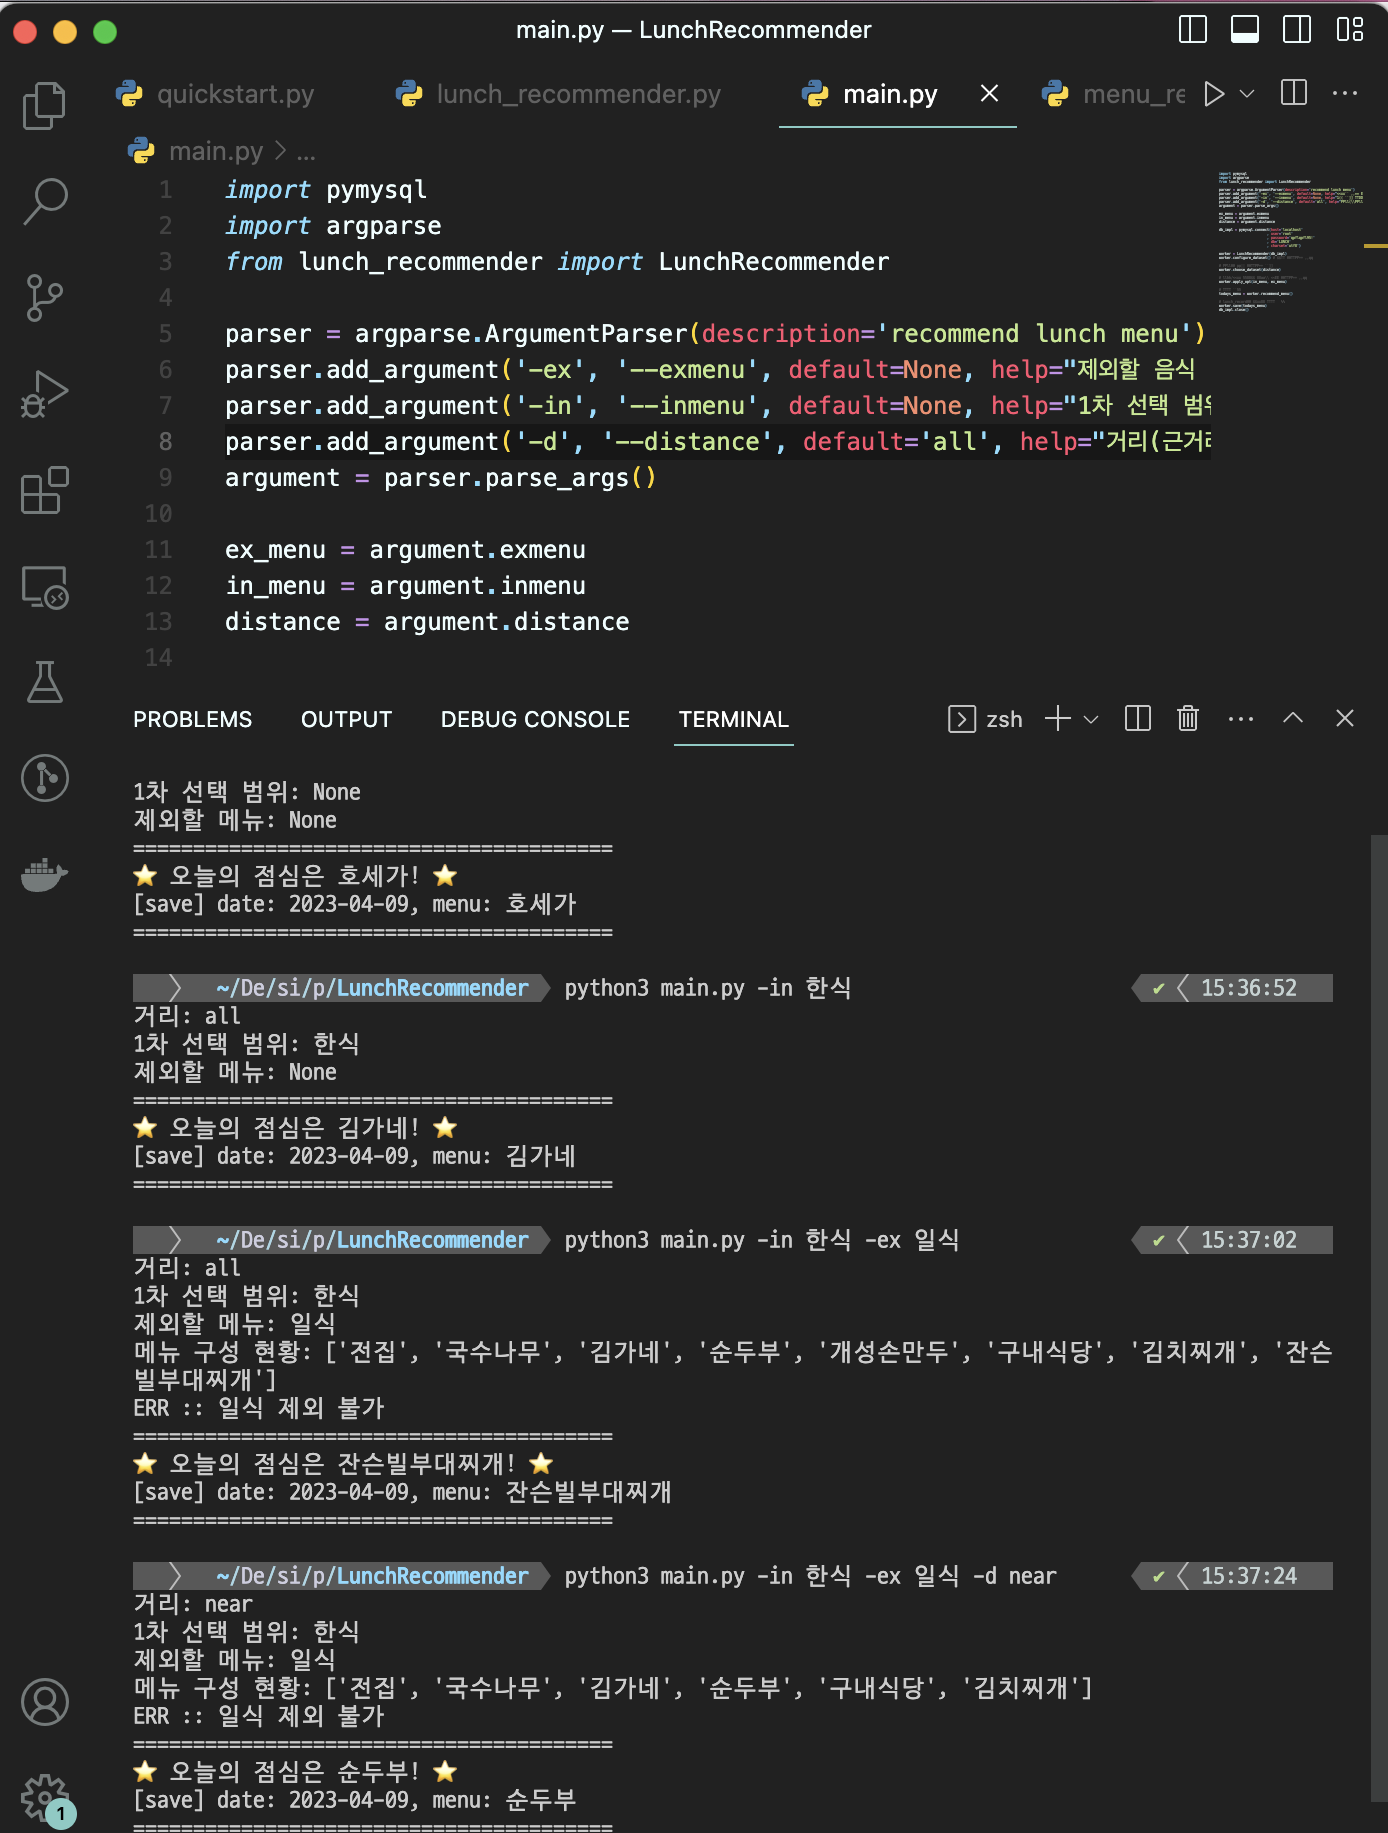
<main.py>
import pymysql
import argparse
from lunch_recommender import LunchRecommender

parser = argparse.ArgumentParser(description='recommend lunch menu')
parser.add_argument('-ex', '--exmenu', default=None, help="제외할 음식 종류 / 음식점")
parser.add_argument('-in', '--inmenu', default=None, help="1차 선택 범위(한식/양식/일식/중식/기타))")
parser.add_argument('-d', '--distance', default='all', help="거리(근거리: near, 거리무관: all)")
argument = parser.parse_args()

ex_menu = argument.exmenu
in_menu = argument.inmenu
distance = argument.distance

db_impl = pymysql.connect(host='localhost'
                        , user='root'
                        , password='1234'
                        , db='LUNCH'
                        , charset='utf8')

worker = LunchRecommender(db_impl)
worker.configure_dataset() # 전체 데이터셋 구성

# 거리에 따라 데이터셋 선택
worker.choose_dataset(distance)

# 포함/제외 옵션을 반영한 최종 데이터셋 구성
worker.apply_opt(in_menu, ex_menu)

# 메뉴 선정
todays_menu = worker.recommend_menu()

# lunch_record에 오늘의 메뉴 저장
worker.save(todays_menu)
db_impl.close()
<lunch_recommender.py>
import json
import random
import datetime

class Constant(object):
    FOOD_TYPE = ['한식', '일식', '중식', '양식', '기타']

class LunchRecommender:
    def __init__(self, db_impl):
        # 변수
        self.all_spots = {}
        self.near_spots = {}
        self.tmp_dataset = {}
        self.dataset = []

        # DB connection
        self.db_impl = db_impl
        self.cursor = self.db_impl.cursor()

        # date information
        self.today = datetime.date.today()
        if self.today.weekday() != 0: # 월요일이 아니면
            self.yesterday = self.today - datetime.timedelta(days=1)
        else:
            self.yesterday = self.today - datetime.timedelta(days=3)

    def configure_dataset(self):
        """
        self.all_spots, self.near_spots 구성
        """
        sql = """
        SELECT JSON_OBJECT
                    ('classification', classification,
                     'restaurant_nm', restaurant_nm,
                     'distance', distance)
        FROM lnch_menu
        WHERE ID_NO = 1;
        """
        self.cursor.execute(sql)
        all_spots = self.cursor.fetchall()
        all_spots = [json.loads(spot[0]) for spot in all_spots]

        for spot in all_spots:
            classification = spot['classification']
            name = spot['restaurant_nm']
            distance = spot['distance']
            # near_spots
            if distance == 'N':
                if classification not in self.near_spots:
                    self.near_spots[classification] = []
                self.near_spots[classification].append(name)
            # all_spots
            if classification not in self.all_spots:
                self.all_spots[classification] = []
            self.all_spots[classification].append(name)

    def choose_dataset(self, distance):
        print(f"거리: {distance}")
        if distance == 'near':
            self.tmp_dataset = self.near_spots
        else:
            self.tmp_dataset = self.all_spots

    def dict_to_list(self):
        tmp_dataset = []
        for spots in self.tmp_dataset.values():
            tmp_dataset += spots
        return tmp_dataset

    def apply_opt(self, in_menu, ex_menu):
        print(f"1차 선택 범위: {in_menu}")
        print(f"제외할 메뉴: {ex_menu}")
        if in_menu:
            self.dataset = self.tmp_dataset[in_menu]
            if ex_menu:
                try:
                    self.dataset.remove(ex_menu)
                except ValueError:
                    print(f"메뉴 구성 현황: {self.dataset}")
                    print(f"ERR :: {ex_menu} 제외 불가")

        else:
            if ex_menu:
                # ex_menu가 음식 종류인 경우
                if ex_menu in Constant.FOOD_TYPE:
                    del self.tmp_dataset[ex_menu]
                    tmp_dataset = self.dict_to_list()
                # ex_menu가 음식점인 경우
                else:
                    tmp_dataset = self.dict_to_list()
                    tmp_dataset.remove(ex_menu)
                self.dataset = tmp_dataset
            else:
                self.dataset = self.dict_to_list()

    def except_yesterday_menu(self):
        # bring yesterday's menu
        sql = """
        SELECT restaurant_nm
        FROM lnch_record
        WHERE yyyymmdd = %s;
        """
        # except yesterday_menu from dataset
        try:
            self.cursor.execute(sql, self.yesterday)
            record = self.cursor.fetchone()
            yesterday_menu = record[0]
            self.dataset.remove(yesterday_menu)

        except TypeError: # 어제 날짜로 먹은 메뉴가 없는 경우
            pass
        except Exception as e:
            print(type(e), e)

    def recommend_menu(self):
        """
        최종 데이터셋에서 랜덤으로 오늘의 점심메뉴 추천
        """
        self.except_yesterday_menu() # 어제 먹은 메뉴 삭제
        menu = random.choice(self.dataset)
        print("========================================")
        print(f"⭐️ 오늘의 점심은 {menu}! ⭐️")
        return menu

    def save(self, restaurant_nm):
        """
        선정된 메뉴 저장
        """
        sql = """INSERT INTO lnch_record
             (yyyymmdd
            , restaurant_nm)
            VALUES (%s, %s);"""

        self.cursor.execute(sql, (self.today, restaurant_nm))
        self.db_impl.commit()
        print(f"[save] date: {self.today}, menu: {restaurant_nm}")
        print("========================================")
lnch_menu 테이블에 데이터를 입력할 수 있는 menu_registrant.py는 아래와 같다. 추후 수정, 삭제도 가능하게 소스를 수정하려고 한다.
<menu_registrant.py>
import pymysql

print("==========================================================")
print("- format -")
print(" 분류; 한식, 일식, 중식, 양식, 기타")
print(" 거리; 근거리: N, 원거리: F")
print("==========================================================")
print()
print(" 음식점 이름, 분류, 거리를 공백으로 구분해 입력하세요.")
print(" * 입력을 중단하려면 'q'를 입력하세요.")
print()

sql = """INSERT INTO lnch_menu
             (id_no
            , classification
            , restaurant_nm
            , distance)
            VALUES (%s, %s, %s, %s);"""

db_impl = pymysql.connect(host='localhost'
                        , user='root'
                        , password='qpflqpfl95!'
                        , db='LUNCH'
                        , charset='utf8')
cursor = db_impl.cursor()

while True:
    try:
        user_input = input(">>> ")
        values = user_input.split()
        if any(val == 'q' for val in values):
            break
        elif len(values) != 3:
            print("------------------------------------------------ 입력 오류\n")
            continue
        restaurant_nm, classification, distance = values
        cursor.execute(sql, (1, classification, restaurant_nm, distance))
        db_impl.commit()
        print("------------------------------------------------ 저장 완료\n")

    except Exception as e:
        print(type(e), e)
        break

try:
    db_impl.close()
    print("--------------------------------------------- DB 연결 종료")

except Exception as e:
    print(f"저장 오류: {type(e)} {e}")
마지막으로 점심시간 10분 전마다 우리 팀의 구글 챗 스페이스에 점심시간을 알리는 메세지를 보낸다. API(polling) 방식이 아니라 역방향 API라 할 수 있는 "웹훅" 방식을 사용했다. API는 클라이언트가 일정 주기로 서버를 호출해 이벤트가 있는지 알려달라고 요청해야하지만, 웹훅은 이벤트가 발생했을 때 HTTP POST를 사용해 미리 지정한 클라이언트의 callback URL로 클라이언트를 호출해 이벤트를 알려주어 API보다 효율적이다.
그렇다고 웹훅이 무조건적으로 API보다 좋은 방식이라고는 할 수 없다. 웹훅으로부터 오는 데이터가 유실될 가능성도 있고 웹훅으로부터 오는 요청은 정상 처리했지만 response를 제대로 보내지 못했을 경우 동일한 정보를 다시 보낼 가능성이 있기 때문이다. 이 부분에 대해서는 API와 웹훅 각각의 장단점을 파악해보고 좀 더 공부를 해보려고 한다.
다시 본론으로 돌아와서 웹훅으로 구글 챗에 메세지를 보내기 위한 방법은 아래와 같다.
출처: https://developers.google.com/chat/how-tos/webhooks 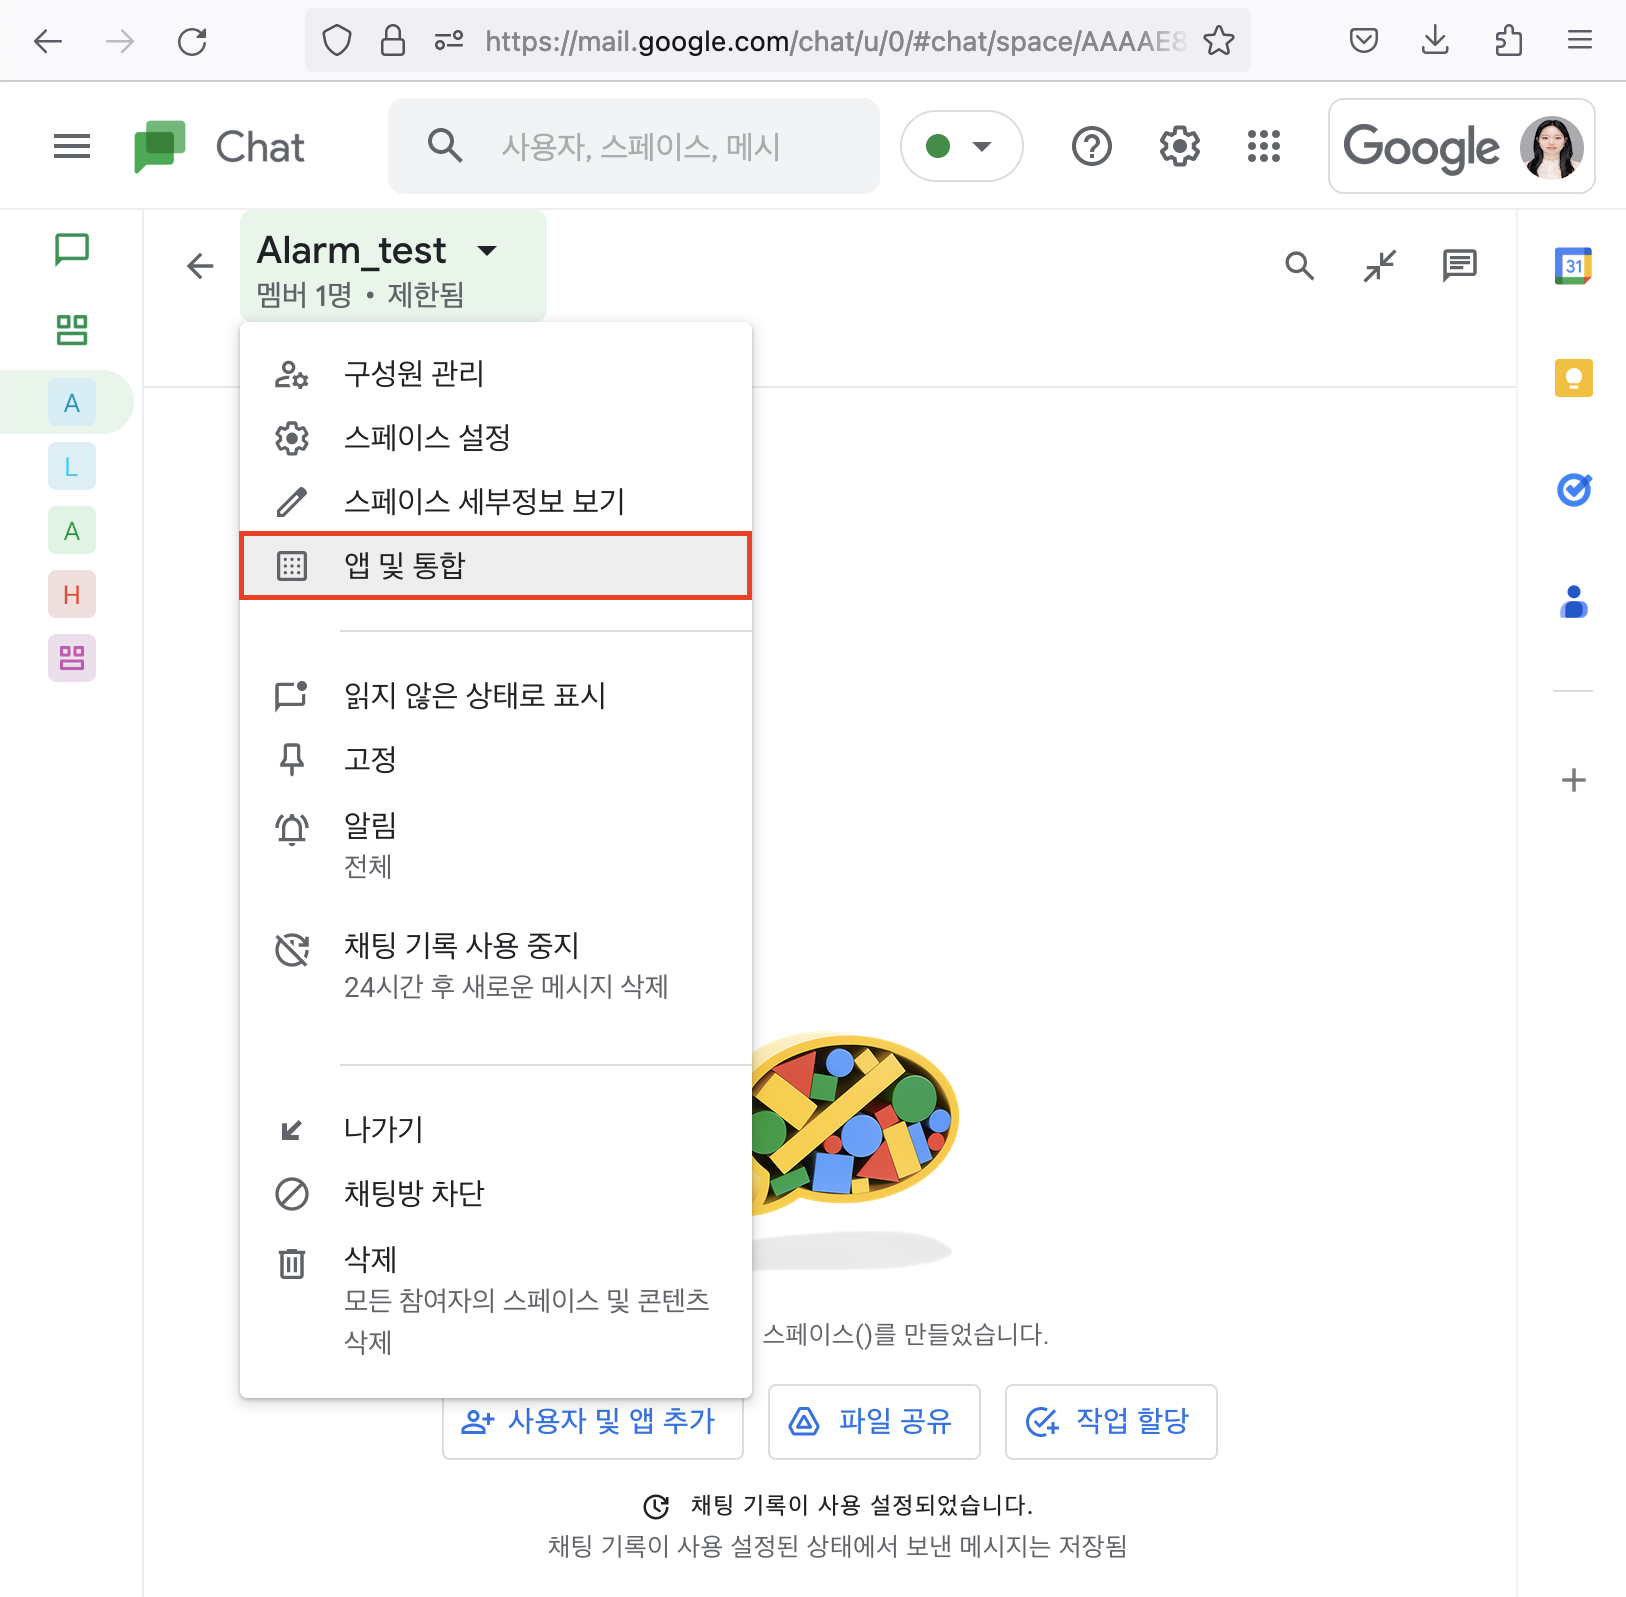
1. 앱 및 통합 클릭 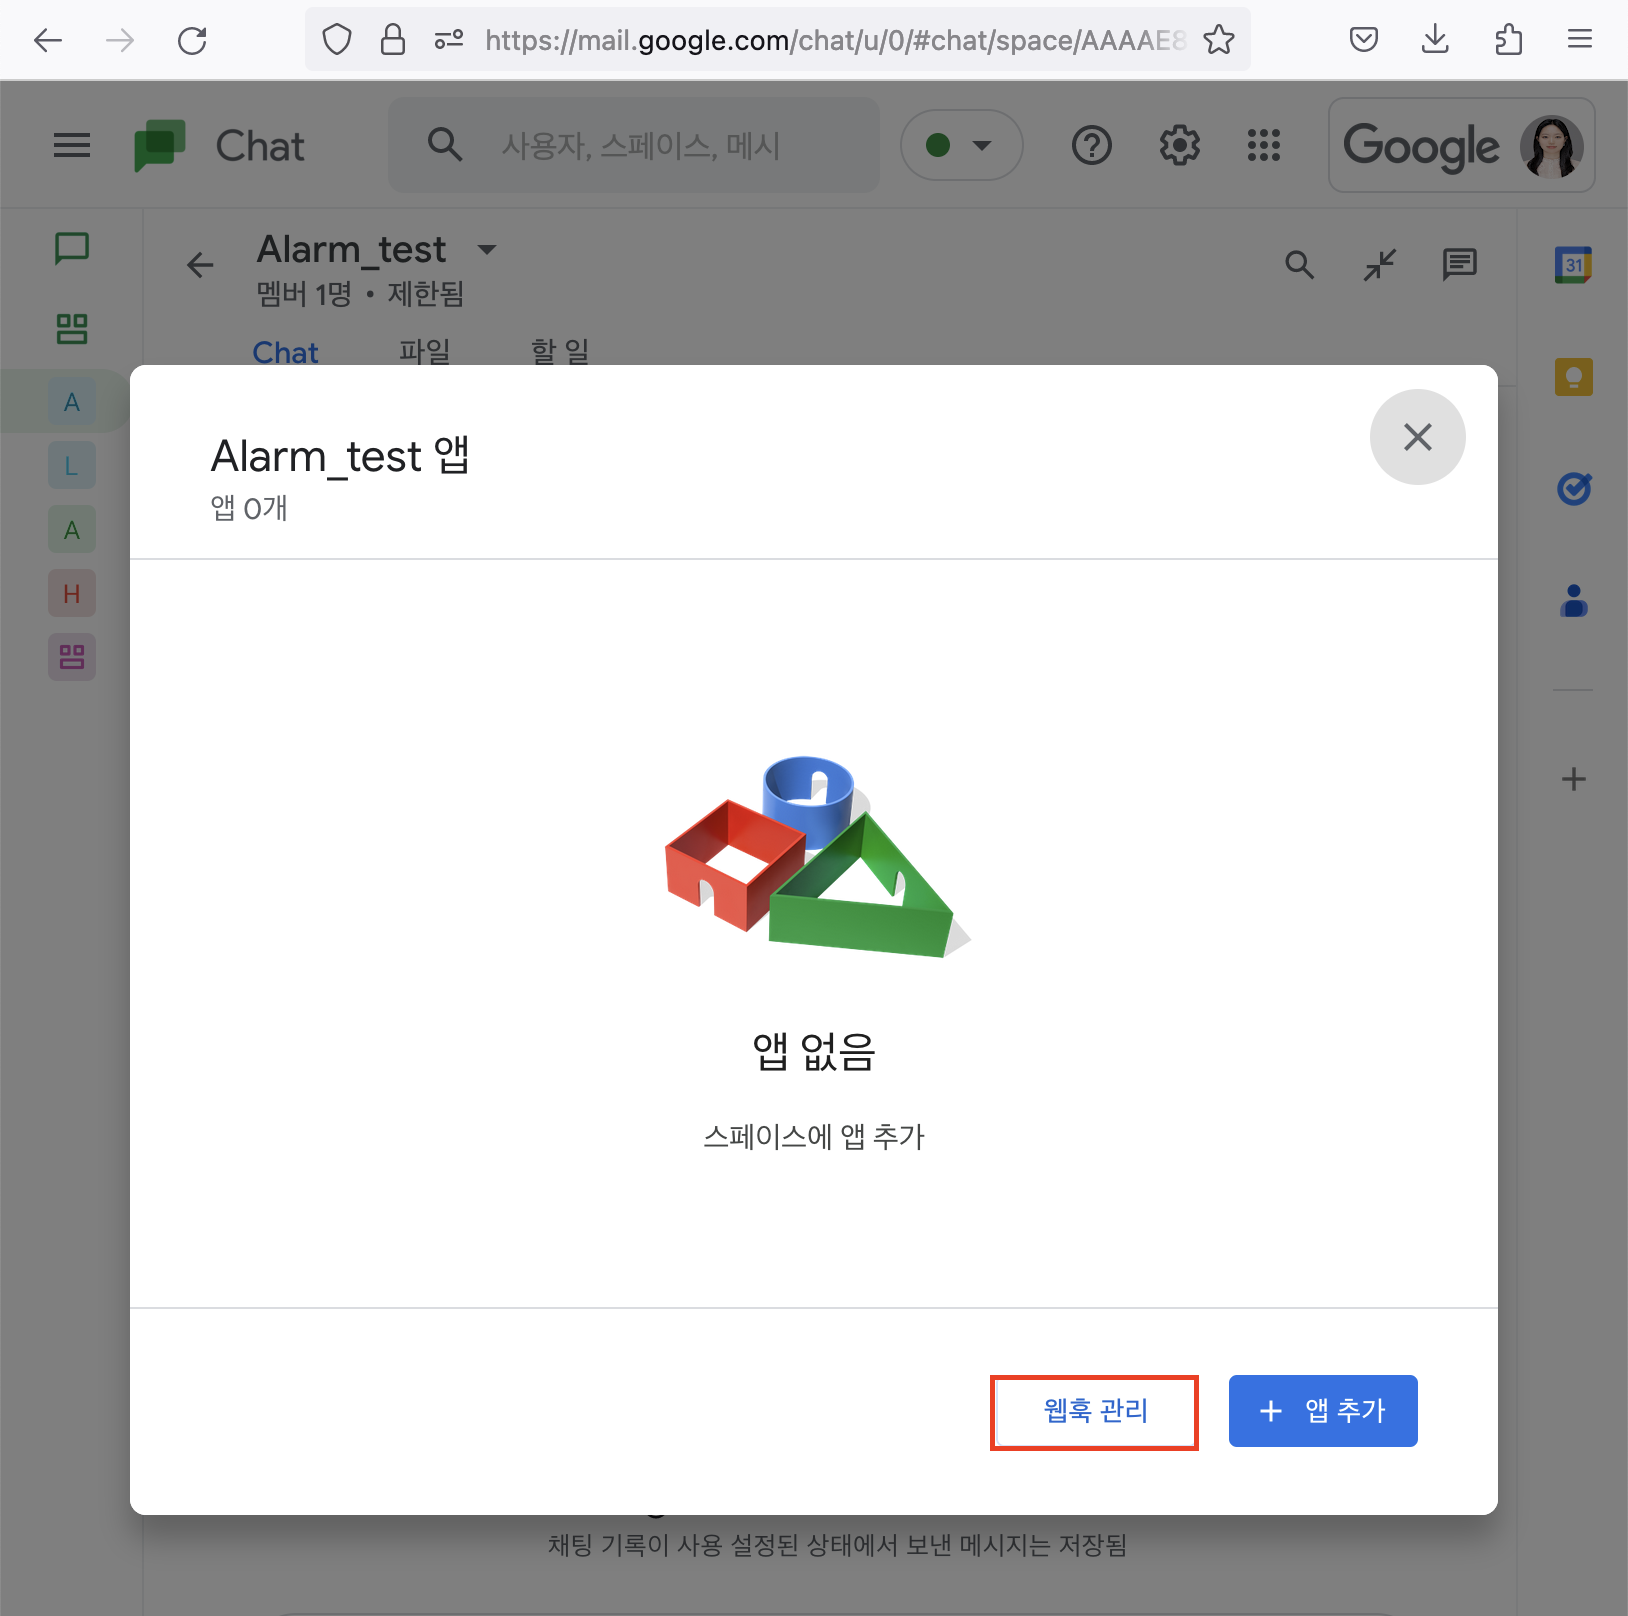
2. 웹훅 관리 클릭 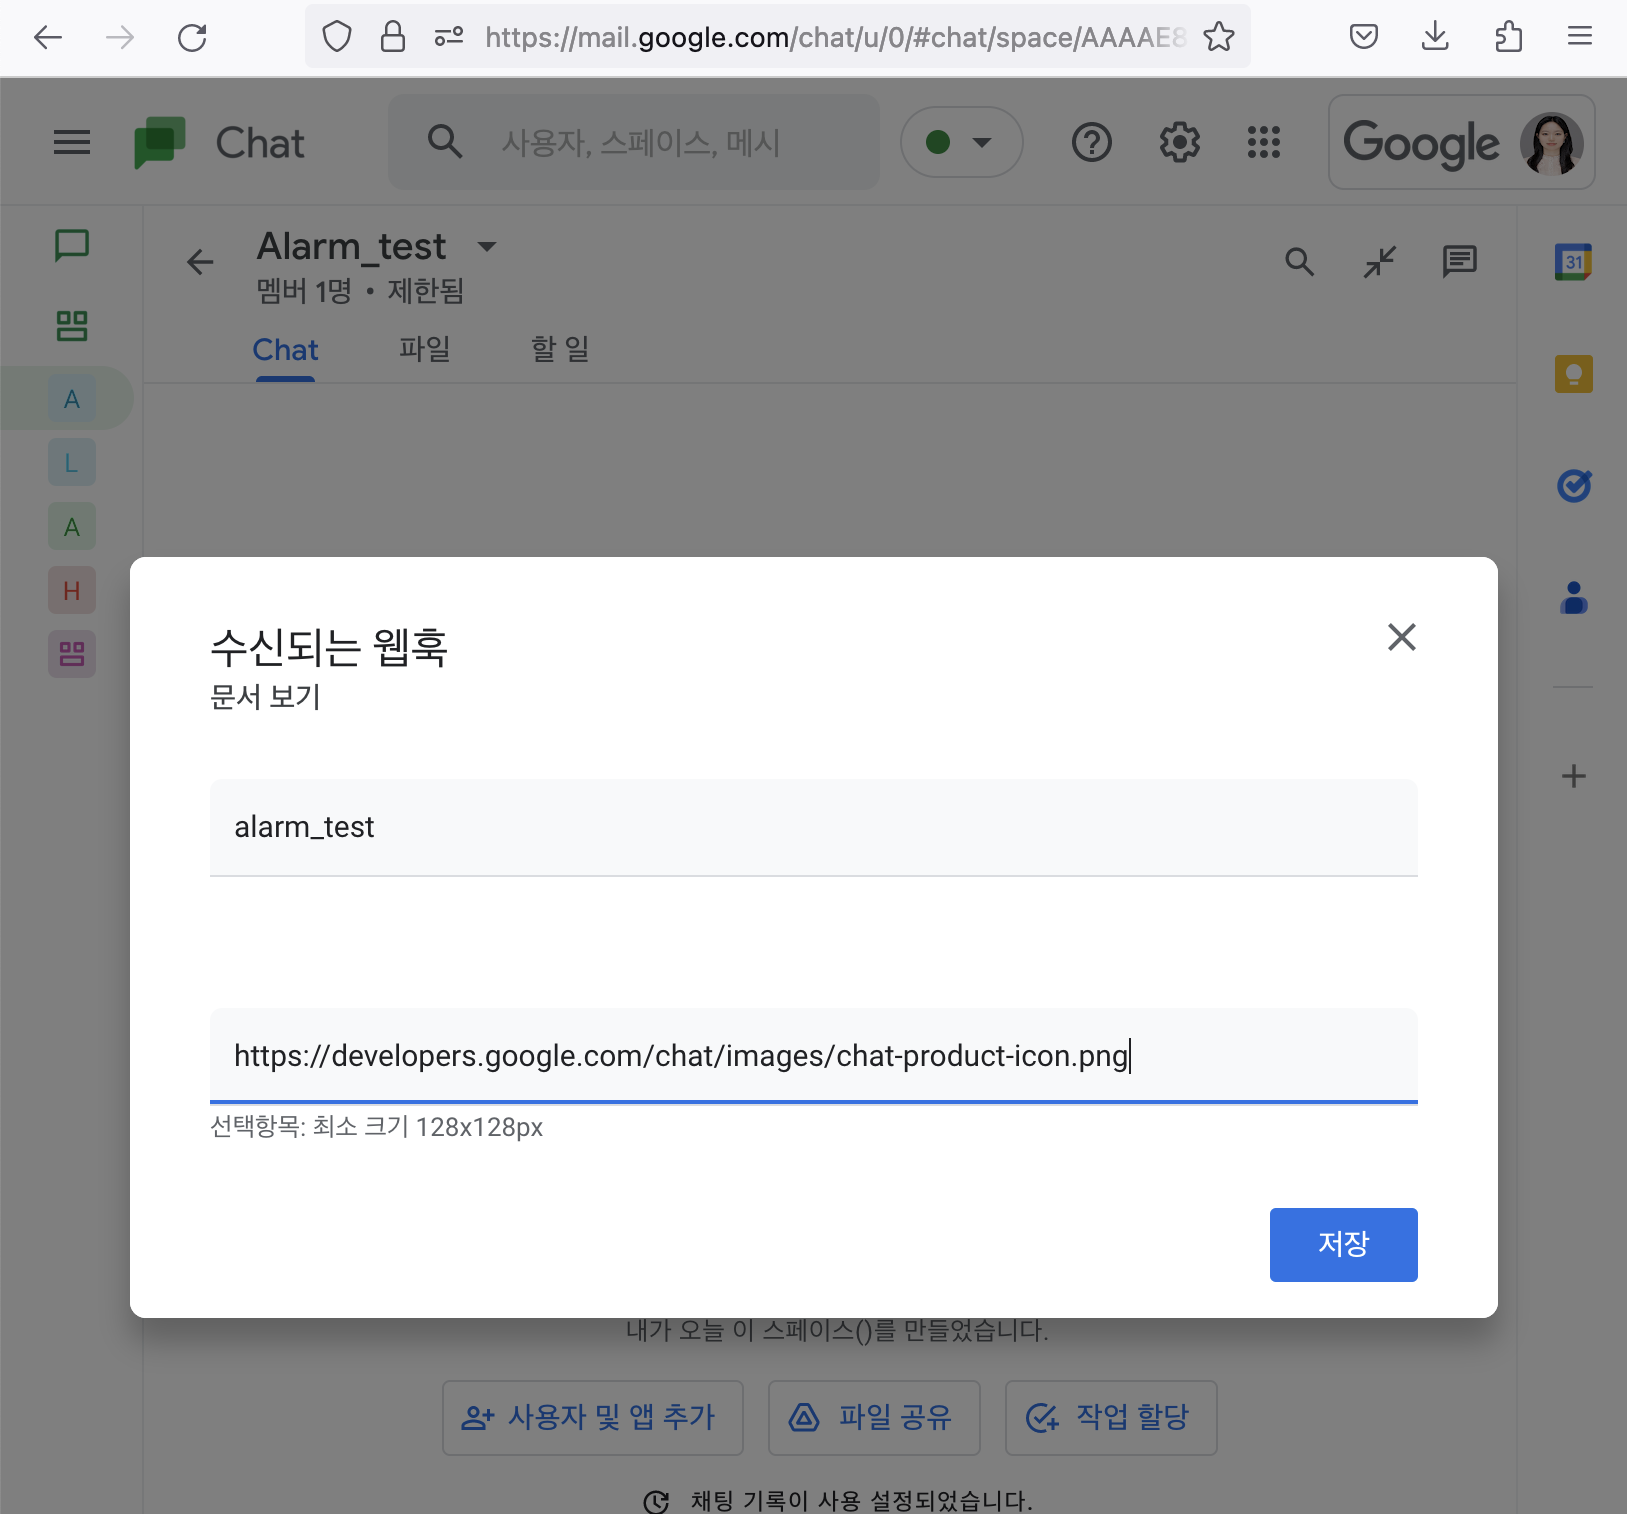
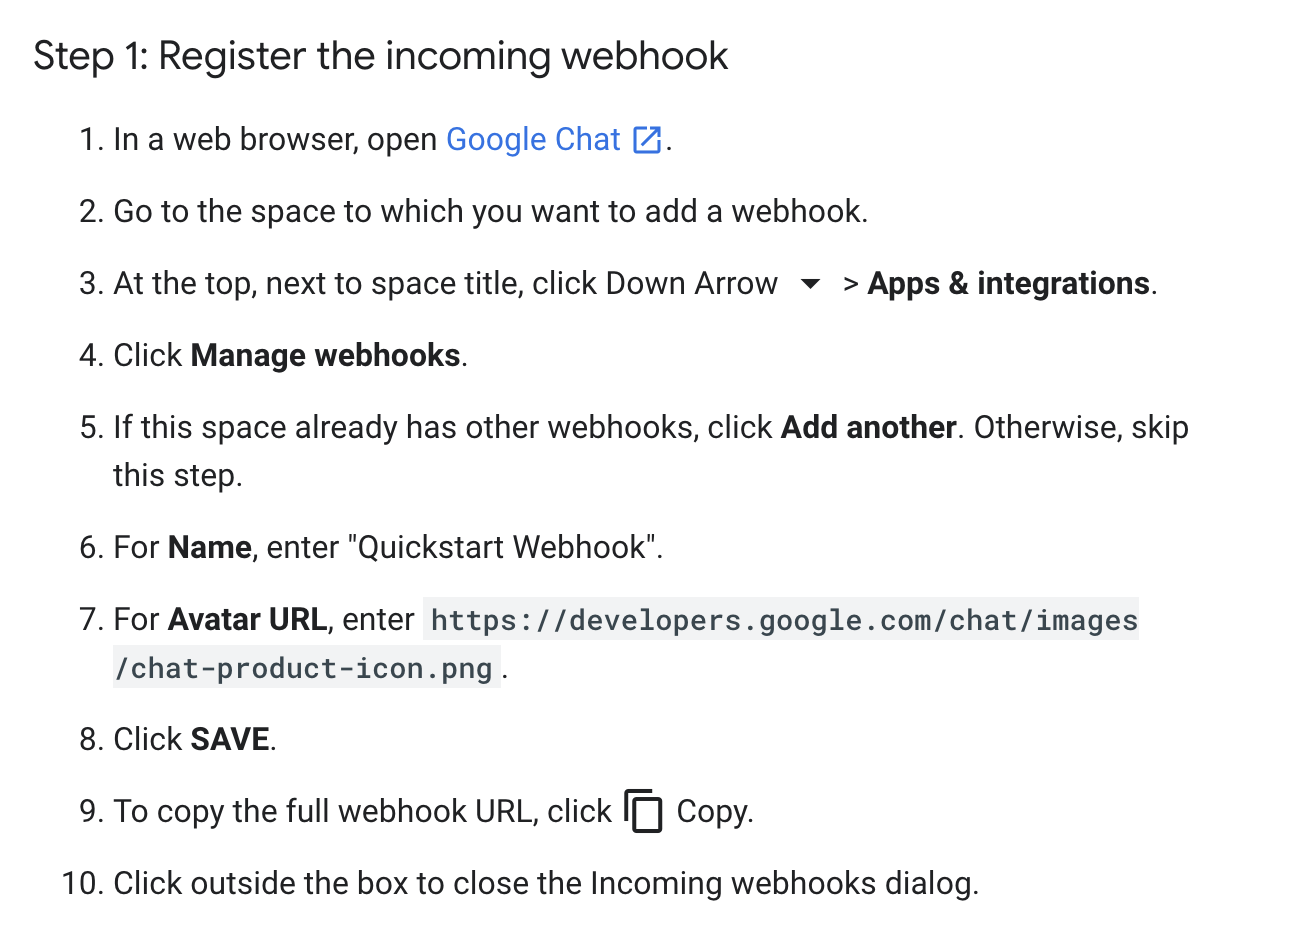
3. 웹훅 이름, 아바타 URL 등록 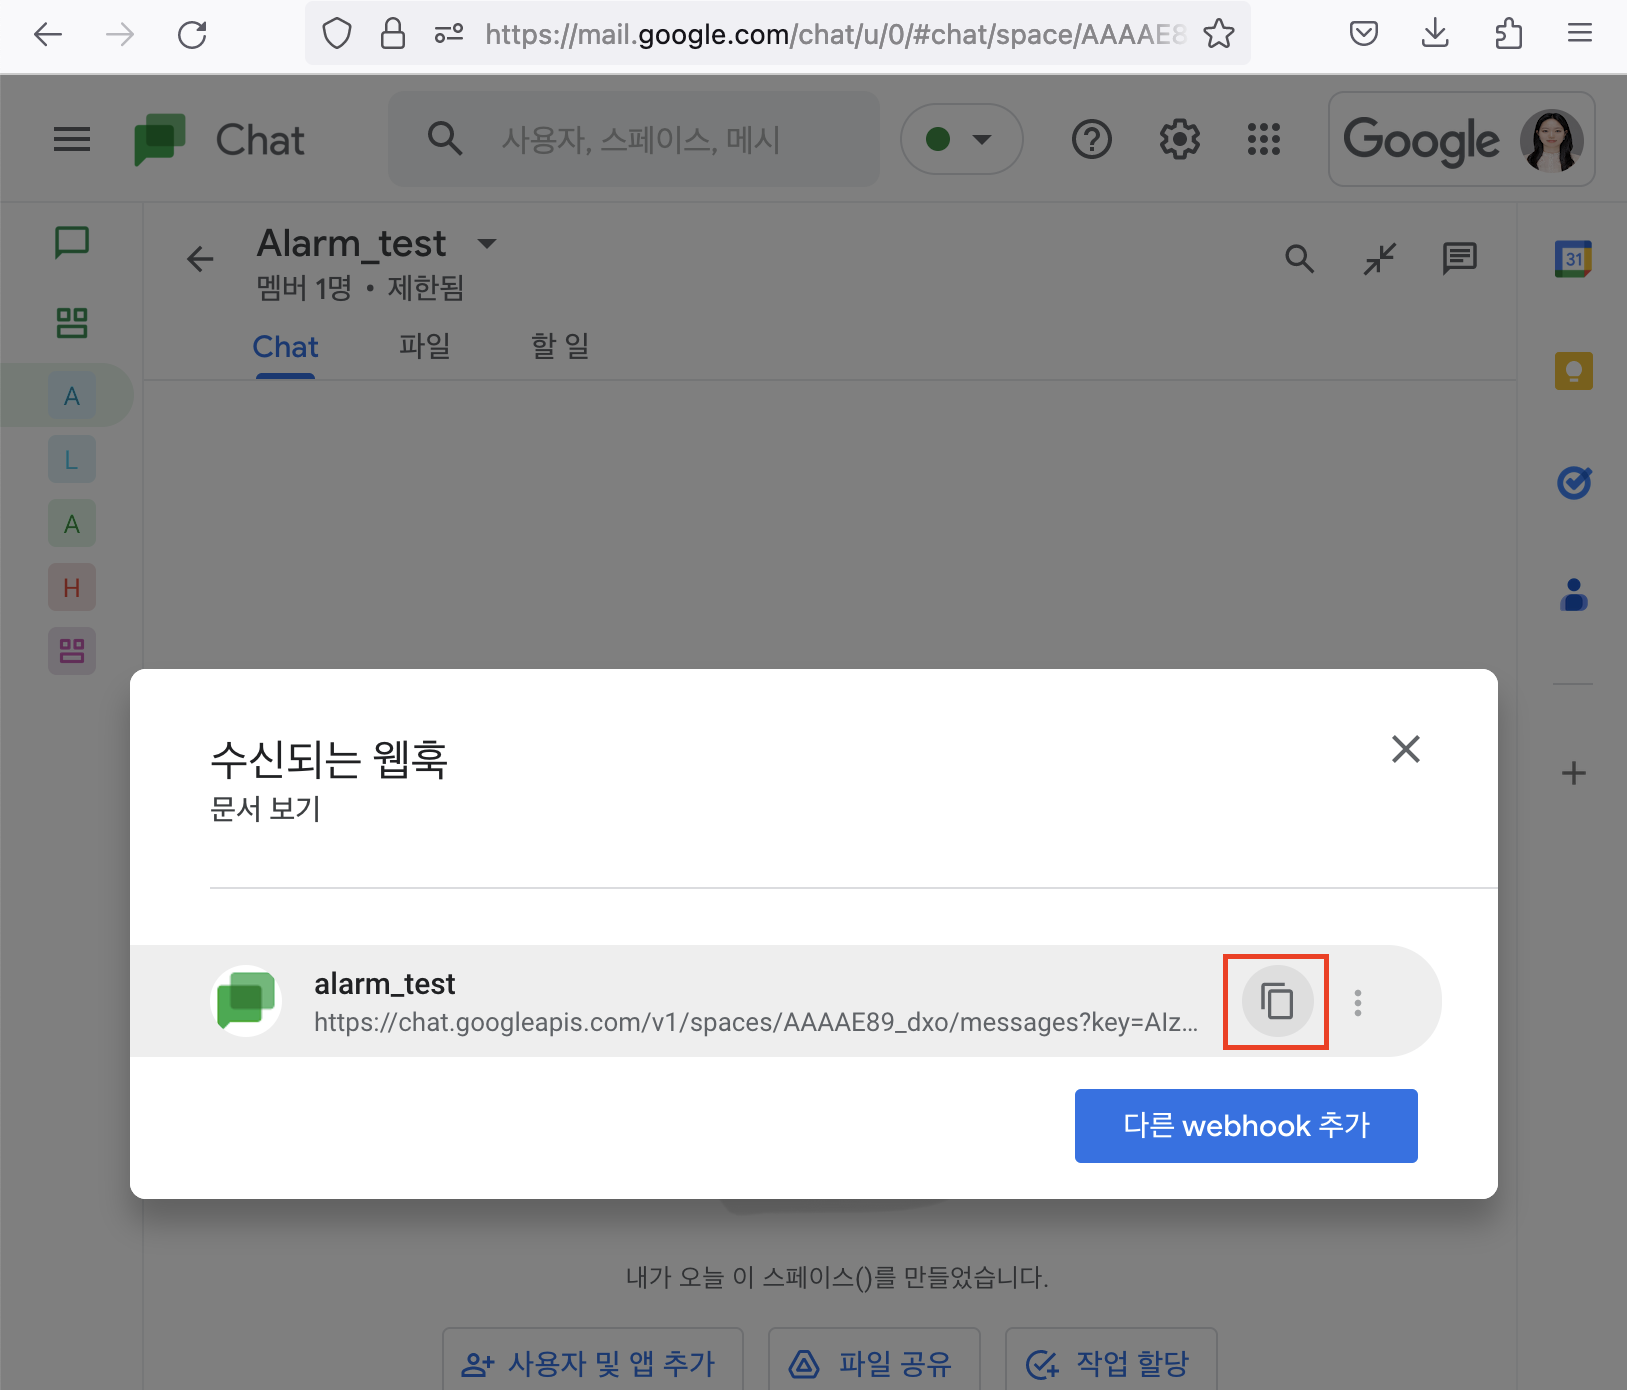
4. callback URL 복사 첨부한 구글 챗 매뉴얼로 들어가면 웹훅을 사용해 구글 챗으로 메세지를 보낼 수 있는 예제 코드를 확인할 수 있다. 위 작업을 마쳤으면 예제 코드를 활용해 quickstart.py를 작성한다. url에는 복사한 구글 챗 스페이스 callback URL을 지정해주고, bot_message에 원하는 메세지를 입력하고 quickstart.py를 실행하면 나의 구글 챗 스페이스로 해당 메세지를 받을 수 있다.
<quickstart.py>
from json import dumps
from httplib2 import Http

def main():
    """Hangouts Chat incoming webhook quickstart."""
    url = 'https://chat.googleapis.com/v1/spaces/AAAAiDIBXGU/messages?key=AIzaSyDdI0hCZtE6vySjMm-WEfRq3CPzqKqqsHI&token=1tV2jPPS0D4b7PrXLo3J9ySDKeOvTtE1CyWeFVvWtVQ%3D'
    bot_message = {
        'text': "🔔Lunch Time!\n점심메뉴 추천 프로그램을 실행시켜주세요😋"
    }
    message_headers = {'Content-Type': 'application/json; charset=UTF-8'}
    http_obj = Http()
    response = http_obj.request(
        uri=url,
        method='POST',
        headers=message_headers,
        body=dumps(bot_message),
    )
    print(response)

if __name__ == '__main__':
    main()
아래는 실행 동영상이다.
csv 파일로 메뉴 리스트를 관리하는 버전 파일이다.
참고:
https://developers.google.com/chat/how-tos/webhooks
수신 웹훅을 사용하여 Google Chat에 메시지 보내기 | Google Developers
이 페이지는 Cloud Translation API를 통해 번역되었습니다. Switch to English 의견 보내기 수신 웹훅을 사용하여 Google Chat에 메시지 보내기 컬렉션을 사용해 정리하기 내 환경설정을 기준으로 콘텐츠를
developers.google.com
https://frtt0608.tistory.com/143
웹훅[Webhook]이란 무엇일까?
✅ Webhook 웹훅은 웹페이지 or 웹앱에서 발생하는 특정 행동(이벤트)들을 커스텀 Callback으로 변환해주는 방법으로 이러한 행동 정보들을 실시간으로 제공하는데 사용됩니다. 보통 REST API로 구축된
frtt0608.tistory.com
'Side Project' 카테고리의 다른 글
I/O multiplexing이 가능한 채팅 프로그램 (0) 2023.03.26 I/O Multiplexing이 가능한 채팅 프로그램 - 개요 (0) 2022.07.05